 My Clinic is in the United States
 My Clinic is in Canada
This webinar aims to provide participants with an introduction to the equipment set-up, the choice of microtools, the methods used for cell preparation and tubing for PGT as well as give troubleshooting tips.
Webinar Author

Cell preparation and Tubing for Pre-Implantation Genetic Testing (PGT)
In this webinar, CooperSurgical’s Global Training Manager, Martine Nijs PhD provides an introduction to cell preparation and tubing for Pre-Implantation Genetic Testing [PGT].
She covers:
- Equipment set-up
- The choice of microtools
- Methods used for cell preparation and tubing
- Troubleshooting tips
- General guidelines when doing preparation and tubing for PGT
The PGT process
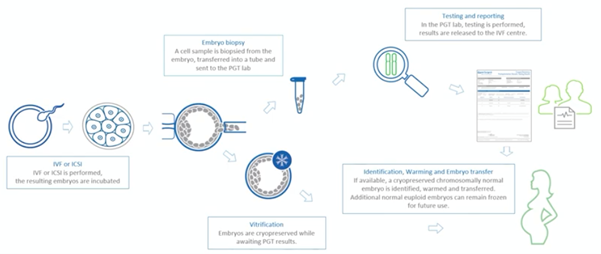
Patients who are undergoing Pre-implantation Genetic Testing will need to undergo IVF or ICSI in order to produce embryos that are cultured until the blastocyst stage, where trophectoderm cells are then being biopsied.
These biopsied cells will then go into a tube. This tube will then be sent off to the genomics laboratory for testing and a report will be generated which will state which embryo is genetically normal.
In the meantime, the embryos (the blastocysts) will be vitrified until the analysis of testing has been done and the report has been produced. From this report, we will then be able to identify the embryos which are genetically healthy and, therefore, those that we will warm and transfer to our patient. Hopefully this will result in a healthy pregnancy.
Equipment set-up
Today we are going to focus on the tubing process itself and I will guide you through a step-by-step process for this. Firstly, however, we need to discuss the general guidelines for this.
These are general guidelines when working with individual cells which are going to be tested for their DNA using an amplification technique of specific regions of that DNA.
This process is the most vulnerable for contamination with foreign DNA. This means that before we start, we need to think really hard about how we’re going to do this and where we’re going to do the tubing procedure.
Ideally, you should have a separate room dedicated to tubing, but this can’t always be the case. The working space, room or flow cabinet that you’re using should be cleaned in order to remove all sources of contamination, cells from your skin, DNA, RNA or cells that come through the HEPA filter.
Clean practice in the genetics lab requires prevention of contamination from human DNA and RNA. There are specific products which can be used in the genetics lab. These are chemical reagents that break down DNA and RNA and will remove all traces of amplifiable DNA.
You can also use UV irradiation. Be aware, however, that the distance between your tubes or the surface and the UV light, will impact the effectiveness of the UV light. At 8cm, for example, UV irradiation is roughly 83% effective, and at 48cm it’s only about 71% effective.
Ethanol does not remove DNA and should not be used.
Cleaning in a genetics lab is not the same as cleaning in an IVF lab. The products that the genetics labs use are toxic for oocytes, embryos and sperm samples so be careful. Don’t use those specific products if you’re going to do the tubing in your lab. If you do, we advise you to clean the surfaces in your standard way and then rinse with DNA/RNA free water to remove all traces of amplifiable DNA.
Sample preparation and collection should be performed at room temperature because DNA degrades at 37 degrees and above. If you can’t switch off your heated stage in your flow cabinet, you could move your working area to a higher level. The RI AMBI-plate is ideal for this for example. You should work at room temperature over a heated surface.
The collection tube rack should be placed on a cool block during the tubing procedure. This is to prevent the DNA from degrading. The cool block won’t be sterile or clean enough, so you should cover it with a sterile cloth.
After the tubing, the sample rack that collects all the tubes should be sealed and stored in a freezer to stabilize the DNA. It will stay there until shipment. Shipment should also be done on frozen ice packs. You should check with the genomics laboratory what the conditions are for your shipping.
All cell sample movements require appropriate witnessing, and all these events need to be recorded. You cannot make a mistake. Make sure you have a robust manual witnessing system in place for all the cell sample movements. Ensure that only the materials and forms from one patient are in that working space, so don’t mix up materials and documents from different patients. This is to make sure that there isn’t a mix-up of cells or result outcomes.
How do we go about this?
Microtools
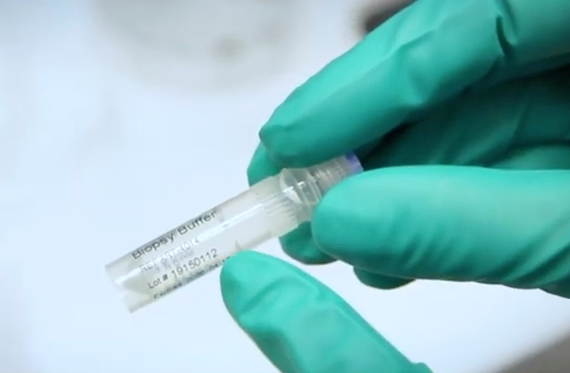
Your genomics provider should offer you the buffer and tubes you need for cell preparation. At CooperGenomics, we have an embryo biopsy kit which contains a sample rack, DNA/RNA free tubes, the buffer and labels with a barcode. These will be unique for that specific biopsy kit.
The rack is also DNA/RNA free but check with your provider which buffer you should use if they don’t supply you with one.
Tubes
Take out a maximum of five tubes, put them in the rack and close them immediately. Put them in a sample rack and add two microliters of the buffer into the tubes. Close the tubes and keep them on the cool block until you’re ready to do the tubing.
We will also place the barcode and the label on the tube so we know which patient it’s from.
Washing dish with warming drops
Now we need to prepare our washing drops. For this, ideally take a 4 well dish. We have the 4 well GPS from LifeGlobal which has numbered wells. In each well, we’ll introduce 20 microliters of the buffer. Each well will contain a washing drop of the sample. Later on, the sample will then be moved through these drops.
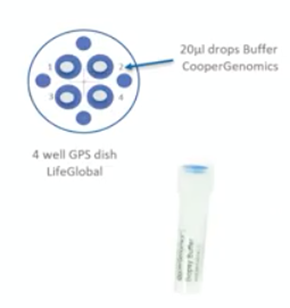
You should have a unique and freshly prepared dish for each embryo. Once it’s prepared, make sure you cover it because we don’t want any evaporation. Again, this should be done at room temperature.
Never reuse the drops or the dishes. Also make sure that the dish comes from a fresh sleeve to avoid contamination of foreign DNA and RNA.
Methods used for Cell Preparation and Tubing
Now we have our washing dish and our tube with the two microliters of buffer on a cold block, let’s take our sample.
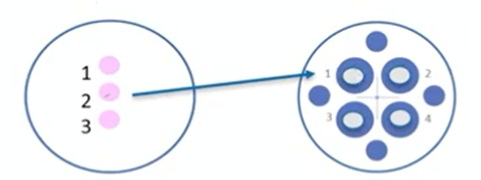
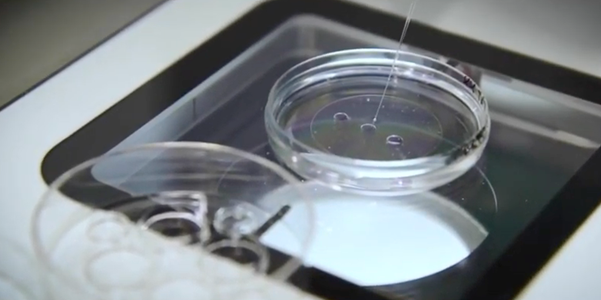
On the left, we have our sample dish. The biopsy dish has a sample in drop number two. It includes the name of the patient and the embryo number. We will write the same in the washing dish on the right. Then we’re going to move the sample from the biopsy dish to the washing dish.
For this, we will take a handling pipette and prime it first with the buffer. Then we’ll take the sample and move it to drop number one. After that, we’ll expel the medium, take fresh medium, take the sample and move it to drop number two. We’ll expel the medium, (we take fresh medium from drop number three), take the sample and move with two, three and so on.
After this final wash drop in four, we take the sample and bring it in the tube. The volume of buffer with the sample going to the tube is not more than 0.5 micrometer of the buffer.
Cell sample washing and tubing
We put our tube at an angle in the dish. You can also use the cover of the petri dish to hold the tube.
First, we’ll focus on the sample in the drop aspirated with 0.5 micrometer of buffer. Then we’ll move the dish and focus on the tube and bring our pipette in there and deposit the sample at the bottom of the tube.
Close the tube, write the embryo number on the top and on the label. A witness will make sure that we have labeled the correct number on the tube. We record this as well and afterwards, quickly centrifuge the sample. Store it and freeze it in the sample rack.
Now we’ll look how this will work in practice and I’ll guide you through the steps.
Tubing of Trophectoderm Cells in preparation for PGT with CooperGenomics Biopsy Kit
As I said earlier, before you start, make sure that the area is cleaned and that all the equipment you’re going to use is clean and DNA/RNA free and dedicated to tubing.
You should also wear protective personal equipment like a surgical gown, mask and sterile gloves. We have to cover all of our skin because the skin could contaminate the tubing.
Put a sterile cloth over the cool block and take the sample rack box from the embryo biopsy kit. All this is DNA/RNA free so we can touch it with our sterile gloves.
The outside of the box is not clean so use a sterile cloth to move it. Take out the sample rack box, put a plastic bag behind it and open it. Here we find our buffer. Take out the buffer that you’re going to use for the washing and tubing. Then check the lot number and the expiry date and the witness should record all this on the biopsy worksheet.
Next, take out a maximum of five tubes and then close them immediately and put them in the rack. Next, label the tubes. With the CooperGenomics labels, there is also a barcode. The label needs to go as high as possible on the tube and end with the barcode. Also give one of the labels to a colleague who can stick this to the worksheet so we’re sure that the ID is the same on the tubes as on the worksheet.
Now we’re going to prepare the tubes. Add two microliters of buffer, making sure that the tips are DNA/RNA free and that the tip boxes are dedicated to the tubing work.
One by one, add two microliters of the tubing fluid and immediately close the tube after you’ve added the buffer. When that’s done, start preparing your washing dish. You should record the name of the patient and the embryo number on the dish.
Next, add 20 microliters of the buffer in each of the wells. Remember, you should use a fresh dish for each embryo.
Now take the biopsy dish itself, prime the pipette and transfer the sample from droplet number two to the first washing drop.
Continue to monitor through the stereo microscope.
Try to avoid making any bubbles because doing so will make life much more complicated when moving the sample.
Expel the excess content, take fresh medium from the next drop and then move back to your sample. Aspirate the sample and then flush it out. Once again, expel the excess medium and take fresh medium from the next drop. Continue to move the sample to wash the sample through these four drops. Try to avoid taking oil from the biopsy dish through the washing steps because oil might interfere with the amplification of the DNA.
Now we have the sample in the pipette with 0.5 microliter of buffer, we’re going to focus on the tip of the tube.
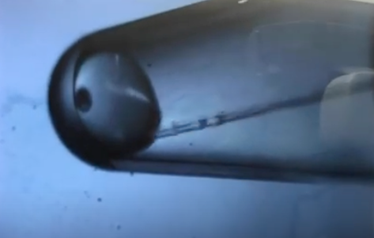
Introduce a pipette and deposit the sample in two microliter of buffer. Flush the pipette to see if the sample has been removed and then write the number of the embryo on the tube and on the label. The witness should also check this and record other important information such as the number of cells, the quality of the specific embryo and so forth.
Quickly spin the tubes in a mini centrifuge. Place them in the tube rack, close the tube rack so the sample doesn’t move and then write the name of the patient and their date of birth on that specific box. The witness will of course double check that this is correct.
Finally, pack the box which will then go to the freezer until it’s ready for shipping.
Tips and tricks
Things can go wrong unfortunately, and cells can get lost at the time of the tubing. If this happens, it means that you need to re-biopsy.
You will need to take a second biopsy from that specific embryo. Just make sure that the tubing is performed before you vitrify the embryos because once these embryos are vitrified, you need to warm, culture and re-biopsy again.
The second biopsy can be taken through the same opening of the zona pellucida. Alternatively, you can make a new second opening and perform the second biopsy from there.
You can use diluted PVP to avoid losing cells during the moving and washing. I find this is more of an experience thing, though. In the beginning, you could use diluted PVP but if you are really experienced, the PVP isn’t absolutely necessary.
Samples can be very sticky. This is especially the case when there is cell lysis in the sample. This can of course result in losing cells because they can stick to your pipette. This goes back to the quality of the biopsy itself.
It’s also possible that the PGT report will say there’s no amplification or result for that specific sample. Again, the embryos have been vitrified so they need to be warmed, re-biopsied and the sample will need to be sent off for testing again. Then they need to be re-vitrified so that’s extra stress.
To take the second biopsy, go through the same opening or make a second hole and perform the biopsy. The embryo can be hatched before embryo transfer in these cases because having two openings is a risk. The risks include potential twinning for that specific embryo or it could stay stuck to the zona pellucida.
True mosaicism versus artefactual
Another important aspect of tubing is mosaicism.
First, we need to explain what the difference is between true mosaicism and artefactual mosaicism.
Mosaicism means that at some point, the embryo has made a mistake. There will be two different types of cells in the embryo which means that mitosis went wrong for one group of cells. This will result in either a mixture of healthy and aneuploid cells, or a combination of different types of aneuploid cells from that specific embryo. This is true mosaicism originating from the embryo itself.
Artefactual mosaicism is actually contamination. This form of mosaicism is created when cells from the embryo are mixed with foreign DNA. That DNA will, of course, amplify but, in the testing result, we can’t see the difference between artefactual or true mosaicism.
We can prevent artefactual mosaicism by reducing the risk of contamination from previous embryos. To do this, we really advise you to change the biopsy pipettes, the handling pipette and to use fresh flushing, washing media and biopsy dishes for each specific embryo.
The result could also be of poor quality and this will then result in a noisy result which is again, artefactual. Most of the time, this happens because of excessive laser use. As explained before, in some of the older amplification systems, the sperm DNA could also be amplified and that would create a pattern of contamination.
Nowadays, the system that CooperGenomics PGTai 2.0 uses creates a pattern that will not be amplified. Please check with your genomics provider if you can do IVF or if you have to exclusively ICSI.
Maternal contamination is also possible. Earlier we discussed the cumulus cells which remain on the zona pellucida which could end up in your biopsy together with the sample. Make sure that you do a thorough denudation and that you visually check if there are any cumulus cells left at the time of the biopsy.
We, the operators, can contaminate as well. Remember to wear personal protective equipment, so the gloves, surgical gown, masks and caps as this will help to prevent contamination with skin cells.
Make sure that you don’t panic through all these procedures. There’s always a solution so we advise that you work with two operators. One will do the biopsy and the other will do the tubing. Both will witness each step; they can check and advise or do troubleshooting at the time. You can always contact us as well.
Summary
Trophectoderm biopsy for PGT requires a high blastocyst development rate, an optimized cultural system and an excellent vitrification program. If you don’t have these, your PGT outcomes will be negatively impacted.
It may require changes in your laboratory flow and also in the use of the equipment. You need an extra space – a clean and uninterrupted space – where you can do your tubing while the biopsy is taking place.
Installation of high-quality equipment is also necessary. You need good aspiration systems, a good laser, a good handling pipette system and so on. A good stereo microscope is also key to visualize the sample.
It is possible that you may have to do your biopsy procedures at different time points or even on different days. This is something you need to decide within your team.
Having a robust witnessing system in all steps of the biopsy and sub preparation steps are all key for cell preparation and tubing. This is so important to avoid a mix-up of wrong diagnosis. Training is mandatory and is critical for both biopsy and cell sampling preparation and tubing.
For the initial training for cell sampling and tubing, you can buy beats that have the same size as blastomeres so you can start by moving those around to see if the tubing is successful. Remember, you cannot test if there’s amplification.
Another possibility is where patients donate material. You do, of course, have to have informed consent from them, and you need to be able to trace which embryos or unfertilized oocytes or whatever you used for that initial training.
An ongoing competency assessment is also key. When it comes to biopsy and cell sampling, you need to keep analyzing those key performance indicators. If you and your colleagues are working to the same quality of the biopsy, technique will affect the PGT result and also the viability of the embryo.
It is really important that you stay up to date with new techniques or changes that might come along.
Thank you for listening to this webinar on cell preparation and tubing for PGT.
About Dr. Martine Nijs PhD
Dr. Martine Nijs is an ESHRE accredited Senior Clinical Embryologist. Martine is also a member of the Editorial Board Faculty 1000 Research, an ad hoc board member of 10 international journals and an active member of eight professional societies.
She is now a valued member of the CooperSurgical team where she works as our Global Training Manager.
Find out more about Dr Martine Nijs PhD.
Additional References
The following are mentioned throughout the text above and/or are particularly relevant to it. To find out more about each item, please click the link.
- Products
- Tubes / Tubing racks for embryo biopsy
- Embryo biopsy kits
- GPS Dishware for embryo biopsy
- RI AMBI-plate
- Handling pipettes for embryo biopsy
- IVF medium for vitrification
- Witnessing Systems for IVF
- Stereo microscopes for embryo biopsy
- Lasers for embryo biopsy
- Genomics
- Procedures